Spiga


Showing posts with label Measurement. Show all posts

Arduino pH Meter with USB Interface

LeoPhi is arduino-based pH sensor with USB interface. It can be used as standalone sensor or be part of another embedded system. The project settled on the USB enabled Atmega32u4, which is a fully USB compatible, with 2.5k of RAM and 32K of flash. It is also the chosen MCU for the Arduino Leonardo and allows users a lot of flexibility in adding pH reading and control to any project. Since the release of the Leonardo and Arduino1.0.1 it is very easy to use and program this unit to match whatever a project demands.

Arduino pH Sensor with USB interface

Read More

Open Source Arduino CAN-BUS OBD Gas Gauge

If you want to add OBD Gas Gauge instrument to your old car, you can try to build your self CAN-BUS OBD Gas Gauge based on Arduino like winneymj did. Before build this project, make sure that your car supports CAN-BUS protocol. Not all cars do, especially older cars, before 1998, but more and more new cars do.


Read More

AVR Electronic Humidor

Electronic Humidor
This Humidor project was designed with a Peltier module and Sensirion SHT1X series sensors. The project built to keep cigars in perfect condition by maintain preferred level of moisture and keep the temperature around 70 degrees. The core of system is based on a microcontroller ATMEGA-16 programmed with BASCOM-AVR. The application is broken into two sections the Menu system that allows configuration of the desired humidity and temperature and what units for temperature you would like to use and display. The Hardware consists of an ATMEGA-16 controller, 7 Tip120 Transistors, 1 DPDT Relay, MC78T12 Regulator, LM7805 Regulator, a few passive components, a 16*2 lcd, and a few connectors.

Tag : Humidity Project, Temperature controller, AVR project


Read More

Arduino Digital Thermometer

Arduino Project Digital Thermometer
This Digital Thermometer based on famous Arduino board and LM35DZ as temperature sensor. The sensor component has three pins, +5V, ground and a variable voltage output to indicate the temperature. This simple project wired the sensor output straight to the Arduino's analogue input 0. As display, it use two line LCD (a Displaytech 162B).

Tags : Temperature Measurement, Digital Thermometer, Arduino project src


Read More

AVR Based Diode Temperature Meter

Temperature Meter
This is Multi channel diode temperature meter project with Microcontroller AVR AT90S2333 as main controller. It can be use to replace thermister temperature meter.

Front end of the temperature sensor and amplifier circuit consists of constant current. Approximately a constant current of 63µA sensor (diode) in the sink, a diode voltage drop of 3-fold amplification and A / D converter (10bit, 3.3V/fs) type. Drift in this block is the main cause of measurement error, the components must be selected as the low temperature drift.

Where an adjustment is not analog, EEPROM calibration parameters are calculated from the temperature to make sure that you store in it. The calibration process is required for proper equipment such as computer terminals instead of the driver. Some cases, ISP via cable (N81, 38.4kbps) has been to enter the calibration mode is turned on and connected.

Download:
Schematic and source code

Tag: Temperature Meter, Microcontroller AVR project, electronic project (src)


Read More

PC Rs232 interface for Hygro-Thermo 433 MHz remote sensor

PC Rs232 interface for Hygro-Thermo
How to build electronic project that receive data from weather sensor? this Telemetering Project could help you. By using Serial interface on the PC, it could receive the data sent in a 433 MHz RF sensor weather of Thermo-Hygro Oregon Scientific shown in the picture. This project build by Ficara emilio.

Download

Source code and schematic

search term : Telemetering, Data Logger, Remote Sensor, AVR Microcontroller Projec (src)


Read More

DS1820 and PIC based Thermometer

Microcontroller Project - DS1820 and PIC based Thermometer
The project will show you how to build Digital Thermometer based on PIC 16F84A and DS1820 as the censor

Download : schematic and source code

related search : PIC microcontroller project, Digital Thermometer, DS1820, Electronic Circuit (src)

Read More

Infrared Thermometer Module

Electronic Infrared Thermometer Module
If you want to build non Contact Thermometer, you can try to use MLX90614. It will reduce your electronic project complexity. Outputs of this module is continuous data flow with an active alarm running in the background, 16-bit digital temperature output data that ranging from -70 °C to 380 °C and Serial data (Auto-baud detection (2400, 4800, 9600, 19.2K, 38.4K)) for microcontroller-to-MLX90614 communications.

The MLX90614 Infrared Thermometer Module is an intelligent non-contact temperature sensor with a single pin serial interface for connection to most microcontrollers. The MLX90614 sensor is designed for non-contact temperature measurements of objects placed within the sensor’s cone of detection. The sensor is comprised of an integrated ASIC and infrared sensitive thermopile detector.

tags: Electonic Module, Infrared Thermometer (src)

Read More

PIC Autorange Capacitance Meter

PIC Autorange Capacitance Meter
This electronic project is really powerful capacitance meter. This is an autoranged Capacitance Meter version, which means one does not need to adjust the range settings. Furthermore, the measuring range is quite large, from 5pF all the way to 2600uF. It is all taken care of by the PIC16F873A inside the circuit.

It is based on a very simple circuit analysis principle of charging and discharging of capacitors in an RC circuit.

download schematic and source code

Capacitacance Meter, Metering Circuit, microcontroller PIC Project link

Read More

Electronic Project : AVR Lux Meter

Electronic Project : AVR Lux Meter
The illumination is how the level of flows of light falling on a surface. . The flow of light is visible, which is defined in the flow (the light power) divided by relative sensitivity of the naked eye on the visible spectrum. This means that the Lux is well suited to the light level of meaning to the human eye. To measure the lighting, we can use Lux Meter.

We can build ourselves Lux meter using electronic components. At the detection of light we use photo diode. However, there is a difference between the spectra simple answer photo diode silicon and the naked eye, it can not be used for lux meter. Some photo diodes for lighting have a sensor compensation color filter on the window to correct its response spectra.

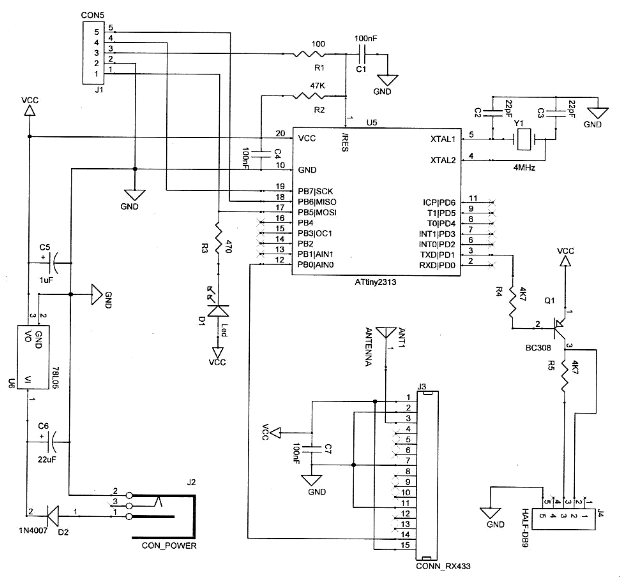
In this project, Photo-diode current results light that is well proportional to the light input power when used in short fashion. In this lux meters, the output current is converted into a voltage converter with an IV, he is caught by a micrcontroller AVR and displayed in terms of lux. The ppamp U1 in the circuit diagram that acts IV conversion circuit and its conversion becomes 50mV / μ A, in accordance with a record of comments R5. The capacitor C5 is to obtain the correction, it cancels Ct of the photo diode (about 200 pF). In this case, greater capacity in May rather be 220 pF because the high frequency signal is not necessary. The lux meter is powered by a 9V battery.

Download schematic, document, firmware (zip) here

[source]

Read More